Crystal grids are beautiful mandalas made of crystals and stones! With the right method and intention, they can be powerful energy tools for healing, spiritual growth and manifestation.
What Is A Crystal Grid Really?
In the simplest sense, a crystal grid is a prayer. It is a way to focus and charge your intentions by placing crystals together in relationship. There are no rules when it comes to creating them, however the more intention and understanding behind the crystal grids you create, the more powerful the result can be!
Crystal grids can be used to raise consciousness, create sacred space, heighten intuition, empower manifestation and more.
Here’s how to make one for yourself!
How to Make A Powerful Crystal Grid:
Here’s what you need:
- A dedicate space in your home, office or out in nature
- A blank slip of paper and a pen to write down your intention
- A crystal point or special center crystal
- 8 crystals of similar size, type or shape
- Additional tumbled-stones (optional)
- Additional nature elements like leaves, pebbles, or flowers (optional)
- Grid cloth (optional)
Crystal Grid Intentions
Step 1: Set Your Intention for the Grid.
What is the purpose of the crystal grid you’re about to create?
Do you want to heighten your intuition? Boost creativity? Raise the vibration of your space? Or improve your health and physical vitality?
Do you want to promote sweet dreams and restful sleep? Manifest financial abundance? Or perhaps you want to attract meaningful relationships and soul connections?
There really are no limits to what can co-create in your life… Get clear about your intention and write it down on a piece of paper. Writing is a special kind of magic that will really help to anchor your intention, so don’t skip this step!
Step 2: Choosing The Right Crystals for Your Grid
To create really powerful and yet simple crystal grids, I recommend a minimum of 9 crystals. This includes one central crystal point or special stone that resonates with your intention, and 8 surrounding crystals that are somewhat similar to each other in size, type or shape.
The central stone holds the intention, and the surrounding crystals interface with the energies of the 8 directions to harmonize, amplify, and strengthen your intention as it moves out into space.
Select crystals that support and enhance your main objective for creating the a crystal grid.
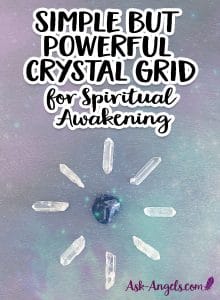
Then for the 8 stones around the Indigo Gabbro, you could use small clear quartz points to further harmonize and amplify the energy of the Jade, and to support the intention to uplift the energy of your home.
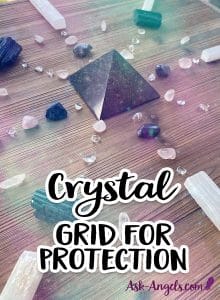
For a simple EMF Protection grid use 8 tourmaline pieces around a central Indigo Gabbro.
For a simple Love Crystal Grid place 8 rose quartz tumbleds around a central amethyst stone.
Keep in mind that you really can’t go wrong here! Trust your intuition and choose stones that you are attracted to while thinking about your intention for the grid.
Use your intuition and pick the crystals that seem to be calling you most in the moment. You will be drawn to the right ones for you!
Types of Crystal Grids
Some examples of stones you could choose based on different intentions include:
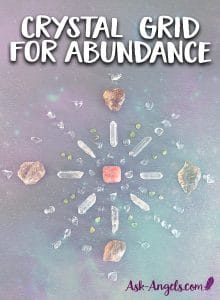
- For abundance consider: peridot, sunstone, clear quartz, pyrite, citrine.
- For a crystal grid for love consider: rose quartz, emerald, clear quartz, amethyst.
- For peace and harmony consider: selenite, blue-lace agate, amethyst, jade, clear quartz.
- To support your spiritual path and uncovering your purpose consider: emerald, indigo gabbro, blue kyanite, clear quartz.
- For health and vitality consider: sodalite, green aventurine, selenite, smokey quartz.
- For EMF protection consider: smokey quartz, shungite, kyanite, pyrite, obsidian, or indigo gabbro.
- To connect with the angelic realm consider: celestite, angelite, selenite, apophyllite, amethyst or rose quartz.
Let your intuition guide you. Working on an abundance grid and for some reason you feel drawn to bloodstone? Trust that, and include bloodstone in your grid. Alternately, use the stones you have available to you, you don’t have to go on a shopping spree to make a powerful and effective crystal grid.
Here are a couple of shops I like to buy from online if you do want to purchase some specific crystals:
Wholesale Bag (10) of clear quartz points for grids >>
I also like using the small tumbled stones which come in the VitaJewel Inu Crystal Waterbottle and their refill crystal jars which are very high quality and work great for creating grids as well as crystal elixirs!
The types of crystal grids you can construct with different gemstones, crystals, flowers, seashells, shapes and intentions is almost endless.
This doesn’t have to be an expensive project either. Don’t have any crystals? Start with river rocks or pebbles from your yard. Another little trick is to buy some gemstone bead chips and make mini grids with those.
Remember, when you listen to your inner guidance, and create grids in alignment with your intuition and with a clear intention… You really can’t go wrong.
Step 3: Cleanse Your Crystals
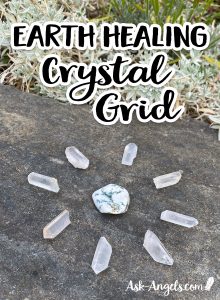
Keep in mind that crystals are living beings and should always be approached with respect and gratitude. Think of them as energetic beings you can collaborate with, rather than trying to control or use them like tools.
Running your crystals under water, spraying them with a cleansing essential oil spray, leveraging sound healing, or smudging with cleansing incense are effective ways to cleanse your stones.
Also invoke higher support:
“Beloved Source of All That Is, Guardian Angels, Guides, Ascended Masters in Spirit…I ask for your support in cleansing this beautiful crystal being of any and all negativity or detrimental energy it may have taken on, to help restore it to its true Divine nature, most vibrant clarity and most radiant light.”
Learn more about how to cleanse crystals here.
Step 4: Prepare the Space:
Once you have your healing crystals ready, locate a space where you can construct your crystal grid. Find somewhere the grid stay in place for a little while rather than building it and disassembling it right away. Some people recommend leaving crystal grids up for months, others for 48 hours… It honestly depends. There’s power in simply creating a grid, so if you don’t have somewhere you can leave it up, don’t let that stop you from enjoying the process and magic of creating it.
Once you’ve found your location, take a moment to cleanse your energy, raise your vibration, and cleanse the energy of the space.
A simple process for this is to focus your energy within and say aloud or clearly in your mind:
“I now call in my team of guides and angels of the highest, most benevolent light. Fill this space with love, light and Divine presence. I ask for your support in cleansing and uplifting my energy… As well as cleansing and raising the vibration of this space.”
Visualize and call forth a waterfall of golden light and Divine healing energy to cleanse and uplift the energy within and around you as well.
This is also a good time to burn a little cleansing incense like sage, juniper, Palo Santo, or to use any of the energy clearing methods I’ve written about here.
Another good way to prepare is to play some relaxing music, light a candle or listen to a guided angel meditation to get into the right state for the powerful energy healing and manifestation process creating a crystal grid entails.


FREE Book Reveals How to Unlock The Healing Power Of Angels Now!
Click The Button Below & Get Energy Healing With Your Angels FREE!
Click Here
Step 5: Laying Out Your Crystal-Grid
Feel into gratitude and joy as if your intention (ie. for healing, abundance, love, etc.) has already manifest in your life.
Keep your intention centered in your awareness. The entire creation process of a grid is like a living prayer.
Begin by placing 4 crystals around the exterior of the space your grid will occupy corresponding with the 4 cardinal directions North, South, East, and West. This establishes an energetic container, and will amplify the energy of your center stone.
You don’t have to use a compass to align these stones, though if you’d like to you absolutely can!
A general rule to keep in mind is to begin from the exterior, starting with placing the four corner stones, and then continue by placing 4 more stones to correspond with all 8 directions, before moving towards the center.
So once you’ve placed the 4 main corners, continue by placing 4 additional crystals to loosely correspond with the 4 four inter-cardinal directions: northeast, southeast, southwest, and northwest.
Adding Additional Supportive Stones
Once the 8-crystal border around your grid has been created, you then have the option to place additional crystals and supportive stones, as well as (completely optional) shells, pebbles, leaves or flowers to further harmonize, influence and support the energy.
This is not required for a powerful grid though!
Beyond having an 8-crystal container, and a special crystal in the center, it’s up to you to decide which crystals if any are added within your grid.
This is a fun and a totally intuitive process. There is no right or wrong, so use it as an opportunity to practice listening to your intuition as to whether you place any additional stones or items in your grid to further focus, amplify and draw forth positive energy.
Bring your grid into a symmetrical shape around the center point, and keep focusing on your intention, feeling as if its already manifest.
Place Your Center Crystal

Placing the central crystal last is symbolic of involution or “returning to center” and returning home to God/ Source/ the One to access infinite possibility.
Depending on the size of this central crystal, you may place in on top of your intention written on a little piece of paper. This is not required, but it is a great idea especially if you’re having trouble staying focused while laying out the grid.
Once you’ve finished placing your center crystal… Take a moment to pause and admire your work before moving onto the next step which is activating your grid!
What is the most powerful crystal?
There’s no one right choice for which stone you choose to place at the center of your grid. A vertical crystal point pointing upwards is a very powerful choice, however a special tumbled stone or even a double terminated point can also be a very powerful to choose for the “master crystal” or stone at the center of your grid.
Clear quartz is the crystal that is most receptive to amplifying your intentions. So its always a good and powerful choice to include.
How to Activate Your Crystal Grid
Step 6: Now its time to activate your crystal grid.
To activate crystal grids I like to call in support from my team in Spirit:
“I now call upon Source, Divine Light, and on the highest and most benevolent guides and angels in Spirit who can support me in activating this crystal grid now for: insert your intention.
Thank you Clear Quartz and Jade for vibrationally anchoring my intention.
I then see or visualize a column light (golden or diamond light) around the grid. This column of light reaches all the way down to the Crystalline core of Gaia Mother Earth, and flows up all the way into direct Oneness with Source above.
This activates the crystal grid and absolutely supercharges your intentions! It is also symbolic of anchoring the highest light of Spirit into the physical.
Feel into the energy of your grid… Feeling it shining and vibrating with the power of your intention like a living prayer.
Finally, finish in gratitude. Gratitude for the stones, gratitude for Source and for your guides… Gratitude for infinite possibility and for your intentions made manifest.
Do Crystal grids have to be symmetrical?
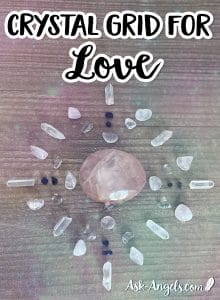
However, I do feel that the healing energy of crystal grids are most powerful when they are symmetrical. I also feel crystal grids constructed with 8 main pillars or stones corresponding with the 8 directions to create a container are the most effective, which is why I’ve shared this method with you here.
As to the exact layout though, you can choose a shape like a circle, diamond, square or sunburst depending on intuitively feels right for you. There are also no rules. If you feel inspired to create a spiral, or a triangle… Go for it!
Some people create crystal grids on top of altar cloths or printouts of a sacred geometry shape like a flower of life, or Metatron’s cube. This is not required, but the sacred geometry does add an additional vibrational energy when used which you may like to include.
Follow your heart and enjoy collaborating with crystals in this way to call forth beautiful possibilities from the infinite into your life!
With love and bright blessings,


Get A FREE Angel Message Now And Tap Into The Healing Power Of Angels!
Click The Button Below For Free Instant Access!
Click Here
P.S. Ready for more?
Learn All About Angelic Crystals here!
Source: Spiritual Living Blog Archives – Ask-Angels.com – www.ask-angels.com


